Cinnamon - for acne, mosquito repellant, etc..

Cinnamon is one of the most popular herbs and spices. Though cinnamon oil has numerous health benefits, it often causes irritations and allergic reactions. Therefore people prefer to use cinnamon directly instead of using the oil. This article, therefore, provides health benefits of cinnamon. The general benefits of cinnamon oil are given at the bottom.

Cinnamon Bark Cinnamon, which has the scientific name Cinnamomum zeylanicum, has originated from tropical Asia, especially Sri Lanka and India. Now the shrub is grown in almost every tropical region of the world. The herb, owing to its vast medicinal uses, had found a prominent position in traditional medicines, especially Ayurveda (the traditional Indian medicinal system). Traditionally cinnamon, due to its medicinal properties, has been used in many cultures for treating a variety of health disorders including diarrhea, arthritis, menstrual cramps, heavy menstruation, yeast infections, colds, flu, and digestive problems.

Now it is being used all over the world for treating a variety of health disorders including respiratory problems, skin infections, blood impurity, menstruation problems, heart disorders, etc. The most widely used part of cinnamon is its bark.


  • Brain Tonic: Cinnamon boosts the activity of the brain and hence acts as a good brain tonic. It helps in removing nervous tension and memory loss. Research at the Wheeling Jesuit University in the US has proved that the scent of cinnamon has the ability to boost brain activity. The team of researchers led by Dr. P. Zoladz found that people who were administered with cinnamon improved their scored on cognitive activities such as attentional processes, virtual recognition memory, working memory, and visual-motor response speed.
  • Cinnamon and Other SpicesBlood Purification: Cinnamon helps in removing blood impurities. Therefore it is often recommended for pimples.
  • Blood Circulation: Cinnamon aids in the circulation of blood due to the presence of a blood thinning compound in it. This blood circulation helps significantly in removing pain. Good blood circulation also ensures oxygen supply to the body cells leading to higher metabolic activity. You significantly reduce the chance of getting a heart attack by regularly consuming cinnamon.
  • Infections: Due to its antifungal, antibacterial, antiviral and antiseptic properties, it is effective on external as well as internal infections. It helps in destroying germs in the gall bladder and bacteria in staph infections.
  • Healing: Cinnamon helps in stopping bleeding. Therefore it facilitates the healing process.
  • Pain: Cinnamon is also anti inflammatory. It helps in removing the stiffness of muscles. It relieves pain and stiffness of muscle and joints. Cinnamon is also recommended for arthritis. It also helps in removing headache that is caused by cold.
  • Diabetes: Cinnamon has the ability to control blood sugar. Diabetics find it very useful as cinnamon aids them in using less insulin. Research has shown that it is particularly very helpful for patients suffering from type2 diabetes. Type2 diabetes patients are not able to use their insulin levels properly. Researchers at the US Department of Agriculture's Human Nutrition Research Center in Beltsville, Maryland, studied the effect of various food substances including cinnamon on blood sugar. They found that a water-soluble polyphenol compound called MHCP which is abundant in cinnamon synergistically acted with insulin and helped in the better utilization of insulin.
  • Heart Diseases: It is believed that the calcium and fiber present in cinnamon provides protection against heart diseases. Including a little cinnamon in the food helps those suffering from coronary artery disease and high blood pressure.
  • Colon Cancer: It also improves the health of colon and thereby reducing the risk to colon cancer.
  • Mouth freshener: Cinnamon is used in chewing gums as it is a good mouth freshener and removes bad breath.
  • Perfumes: It has a refreshing aroma and is extensively used in making perfumes.
  • Indigestion: Cinnamon is added in many ethnic recipes. Apart from adding flavor to the food, it also aids in digestion. Cinnamon is very effective for indigestion, nausea, vomiting, upset stomach, diarrhea and flatulence. Due to its carminative properties, it is very helpful in removing gas from the stomach and intestines. It also removes acidity, diarrhea and morning sickness. It is therefore often referred to as a digestive tonic.
  • Respiratory problems: Cinnamon helps in cold, flu, influenza, sore throat and congestion.
  • Menstruation: Cinnamon is effective in providing relief from menstrual discomfort and cramping.
  • Birth Control: Cinnamon also helps in natural birth control. Regular consumption of cinnamon after child birth delays menstruation and thus helps in avoiding conception.
  • Breastfeeding: It is also believed that cinnamon aids in the secretion of breast milk.

Cinnamon is diuretic in nature and helps in secretion and discharge of urine. It is also aphrodisiac and is believed to arouse sexual desire.

Benefits of Cinnamon Oil
Cinnamon oil is obtained from the bark and leaves of cinnamon tree. Cinnamon oil does have applications in aromatherapy; however, it is not as popular as other essential oils such as pine essential oil, basil essential oil, rosemary essential oil and lavender essential oil.

The benefits of cinnamon oil include the following:

  • Cooking: Many people add cinnamon oil while cooking. Cinnamon oil obtained from the leaves contains a compound named cinnamaldehyde, which is an excellent flavoring agent.
  • Room Freshener: The pleasant aroma of cinnamon oil makes it a very effective as a room freshener. It is often added in potpourris.
  • Eliminating Mosquitoes: Cinnamon oil is a good mosquito repellent. Research has now proved that cinnamon oil is very effective in killing mosquito larvae. The Journal of Agricultural and Food Chemistry (a renowned scientific journal) has reported the research conducted at the National Taiwan University. Apart from the leaves of cinnamon, its bark is also a good source of cinnamaldehyde, which is an active mosquito killing agent. This research has paved the way for finding an environmentally solution for solving the global menace problem.

Many companies producing cinnamon oil claim that it is a good antibacterial and antifungal agent making it very effective on infections. It also helps in blood circulation and acts as a sexual stimulant. Research has also proved that cinnamon oil obtained from the leaves and twigs of cinnamon can be used for controlling mites in honey bees.

Cinnamon oil should not be consumed internally. Further, it can have adverse effects on the skin, if used topically in concentrated form and therefore it should be used in diluted form. Moreover before using cinnamon oil, it should be tested if it suits your skin. Hence apply only a small quantity of cinnamon oil initially and check if you get any allergic reaction. Do not apply cinnamon oil on the face and sensitive areas.

Cinnamon blends well with various essential oils and hence it is added to many aromatherapy preparations. It enhances the effectiveness of other herbs and essential oils and thus speeds up treatment of herbal remedies. Further many herbs have an unpleasant taste. Cinnamon or cinnamon oil is added to herbal preparations to make them taste better. The oil blends well with other essential oils such as lemon essential oil, rosemary essential oil, geranium essential oil, lavender essential oil and cardamom essential oil.

Source: Organicfacts.net

Corn Meal in the Soil as an Antifungal

Cornmeal Has Powerful Fungicidal Properties in the Garden

Using Cornmeal as an Organic Fungicide

By Marie Iannotti, gardening.About.com

Who would have thought that something as seemingly innocuous as cornmeal would have such potent fungicidal properties? Researchers at Texas A&M Research Station in Stephenville, TX, noticed that a peanut crop planted following a crop of corn didn’t suffer the usual fungus diseases. Further research showed that cornmeal contained beneficial organisms that were at least as effective as common chemical fungicides. Somehow cornmeal is able to attract a member of the Trichoderma fungus family, which is a good fungus that kills off disease causing fungi in a matter of weeks.

Howard Garrett, the Dirt Doctor, has continued the study and finds cornmeal effective on most everything from turf grass to black spot on roses. Furthermore, since it is entirely organic, it can be used on edible crops.

How To Apply

Dry: Work 2 pounds of cornmeal into the soil for every 100 square feet. Water well, to activate the fungus killing properties. One application per season is usually sufficient, but repeat applications won’t hurt anything.

Spray: What’s called ‘cornmeal juice’ can be made by soaking 1 cup of cornmeal in 1 gallon of water overnight. Strain the liquid and use as a spray on susceptible plants.


Cornmeal vs. Horticultural Cornmeal vs. Corn Gluten

Any type of cornmeal can be used as a fungicide.
  • Food grade cornmeal, found in grocery stores, will work just fine, but it is more expensive and comes in smaller quantities than horticultural cornmeal.

  • Horticultural cornmeal has not been stored under the stricter guidelines required for food grade cornmeal. Hort cornmeal is general used for livestock feed. It too will work just fine as a fungicide and it comes in bulk.

***Corn Gluten should not be used as a fungicide. Corn Gluten is cornmeal that has been processed to have a higher protein content. Iowa State researchers discovered that cornmeal gluten can inhibit seed germination. It is now used as a pre-emergent weed killer. That’s a great tip, but don’t confuse corn gluten with the fungicidal properties of corn meal.

A final bonus, cornmeal also appears to be a source of nutrients for the soil.


Per the Dirt Doctor:


Cornmeal

Cornmeal has become one of the staple products that I talk about every day as I’m sure you know but it is confusing. The confusion comes in because there is grocery store cornmeal, horticultural cornmeal, whole ground cornmeal and corn gluten meal.

The research on cornmeal was done by the Texas A&M Research Station in Stephenville. Dr. Joe McFarland headed that work before his retirement. The discovery of cornmeal’s fungal disease control came about by noticing the peanut crops. Under research observation at the research center these crops didn’t have fungal diseases when they followed the corn planting in rotation. Lab tests related to that later discovered the beneficial organisms in cornmeal were as effective or more than chemical fungicides at shutting down fungal diseases. That’s why we now recommend it for use on brown patch in St. Augustine grass, damping off in seedlings, black spot on roses and many other fungal diseases. Dr. Nick Christian’s stuff at Iowa State University discovered the use of corn gluten meal for use as a natural weed and feed. Time to put it out right now before weed seed germination, at 15-20 lbs. per 1,000 square feet.

Monthly check list : for texas zone 7a, USDA hardiness zone 8, Texas Region 3
source: dale groom, Calloway's Nursery, Texas A &M

January -

plant chilled tulips and hyacinths now with slow release fertilizer

spring bulbs planted in the fall should be up and growing now

Buy and plant fruit trees

Prune trees and ornamental grasses

Test and amend garden soils, adding organic matter as needed

Spray Dormant Oil on shrubs and trees to prevent scale

Water late in the day (and in advance of freezes)

Spring Garden:
Jan. 1 - spinach
Jan.15- carrots

February:


plant amaryllis, paper white narcissus, gladiolus. Plant gladiolus every 2 weeks through april for continuous blooms in may and june.

plant beets, broccoli, cabbage, carrots, cauliflower, collards, corn, swiss chard, irish potatoes, kohlrabi, lettuce, mustard, radish, rutabagas, snap beans, shallots,turnips

start seeds in green house: tomatoes, peppers, eggplants

harvest onions and shallots, divide harvest in half and replant one half. The replanted ones will grow until june when it will be lifted and dried and the small bulbs will be stored for planting next fall.

when Cauliflower heads are about the size of a silver dollar, pull the leaves over the center of the plant and fasten them together with a clothes pin. (this causes them to come out creamy white by shading them from light)

harvest the lower leaves from leafy vegetables, harvest snow peas frequently

Plant Trees, shrubs, roses
Apply Preemergent Weed Preventers , Crabgrass Preventer to stop grassy weeds before germination
Portrait to stop broadleaf weeds

A&M spring garden schedule:
after Feb. 1 - asparagus, beets, broccoli, cabbage, carrots, cauliflower transplants, swiss chard, collards, kohlrabi, leaf lettuce, mustard, onion plants, parsley, english peas, radish, turnip,

before 2/15 - spinach
after 2/15-potatoes

after 2/25- sweet corn,


March:

Plant spring annuals and perennials, trees, shrubs, roses

apply lawn food

prune oleander and crepe myrtles

late march: plant caladiums to get them started - indoors

plant summer flowering bulbs,

divide the summer flowering bulbs

fertilize shrubs

bag up fallen leaves for mulch to be used in the drought season

late march: cantalope, corn, cucumbers, eggplant (transplants), peppers (transplants), southern peas, pumpkin, summer squash, tomatoes (use transplants), watermelons

harvest root crops: radish when top of root is 1" in diameter, carrots - 1 ", turnip - 2", beet - 3", rutabaga - 3-4"

harvest broccoli when the largest flower buds in the head are the size of the head of a kitchen match

crop leafy vegetables regulary - harvest lower leaves first.

get a head start on weeds - mulch beds 3-4" and pull baby weeds

A&M Spring garden schedule:
sweet corn, mustard, radish
by 3/1 - beets, broccoli, cabbage, carrots, cauliflower tranplants, kohlrabi, onion plants, parsley,
english peas, potatoes,
after 3/5- beans, snap bush, snap pole, cucumber, summer squash, winter squash,
by 3/10 - turnip
by 3/15 - leaf lettuc,
after 3/15 - beans, lima bush, lima pole, egg plant, cantelope, pepper transplants, tomato transplants, watermelon
before 3/25- swiss chard, collards
after 3/25 - southern peas,

April -
Azaleas and Irises in bloom

plant the bulbs started indoors into beds now (i.e. caladiums) -- plant caladiums mid to late april , one month after the last killing frost

plant trees, shrubs, roses

plant spring annuals and perennials

apply CORN MEAL for fungus

Feed trees and shrubs
prune shrubs


plant salvaged potted easter lillies in spot that gets morning sun and afternoon shade - they will rebloom next year

plant: cantalope, collards, corn, cucumber, cushaw, eggplant, honey dew, lima beans, luffa, malabar spinach, okra, peppers, pumpkin, snap peas, southern peas, squashes, sweet potatoes, swiss chard, tomato and watermelon

herbs to plant: basil, perilla, sesame, lemon balm, mint, rosemary

cage tomato plants, grow cucumbers on sturdy trellises at least 4' tall for increased production

A&M Spring planting guide:
beans, snap bush; sweet corn, cucumber, eggplant, cantelope; southern peas, pepper transplants
radish, summer squash, winter squash, watermelon
by april 1- mustard
by 4/10 - tomato transplants
after 4/10 - sweet potato slips
by april 15- beans, snap pole, beans, lima bush; beans, lima pole;
4/1- 4/20 - pumpkins


May - Oleanders in bloom

plant: collards, eggplant, okra, peppers, luffa (aka "climbing okra") , peanut, pumpkin, southern peas, sweet potatoes, squash (use slips), tomatoes (seed for transplants), cantalope, watermelon

Plant spring annuals and perennials
plant caladiums
plant trees, shrubs, roses

apply 2nd application of preemergents

Feed lawn

A&M spring garden guide:
by 5/1 - beans, snap bush, sweet corn, cucumber, eggplant, cantelope, pepper transplants, radish
summer and winter squash, watermelon
by 5/15- sweet potato slips
by 5/20 - southern peas


June -
in bloom: roses, oleanders, gladiolus, lantana, purple jew, hydrangea, calla lilly, canna, esperanza, hibiscus

plant summer annuals, perennials

fertilize container gardens

control insects with bayer complete insect granules

treat for june bugs

apply granules to control fire ants

trim faded flowers on oleanders, crepe myrtles and roses to encourage more blooming

treat for white flies - 3 applications 10 days apart in the morning hours

plant cantalope, collards, eggplant, luffa, okra, peanuts, peppers, pumpkin, southern peas, sweet potato slips, swiss chard, watermelons

late june: plant transplants of tomatoes, bell peppers, and eggplant

June Gardening Guideline

by Keith C. Hansen, Extension Horticulturist, Smith Co. - Tyler, Texas

School's out, it's getting hotter and summer time activities are getting into full swing. June brings both the opportunity to plant summer color, and the routine garden maintenance of mowing and weeding. This spring's plentiful rainfall has hopefully helped our lawns, trees and gardens to begin to recover from last year's extreme stress. Take advantage of the longer days by doing gardening tasks in the morning or evening when it is more pleasant to be outside. To keep the lawn and garden looking great, here are a few tips for this June.

LAWNS

Hotter weather means grass will be growing faster. Keep up with the mowing so you don't have to bag the clippings. That may mean mowing every 5 or 6 days instead of every 7 to 10 days. Letting the clippings fall back into the lawn recycles nutrients but does not promote thatch. Keep the mower blade sharpened. Mowing frequently at the correct height will promote a healthy, thick turf that is resistant to weeds.

For St. Augustine or Bermuda lawns making poor growth thus far this year, make a second application of fertilizer. For best results, use a fertilizer with a high percentage of slow- release nitrogen so the grass won't grow quite so rapidly. Be careful to not apply too much fertilizer.

Warning! A wet, rainy June and lushly growing grass from high rates of nitrogen can lead to grey leaf spot, a fungal disease of St. Augustine grass. Symptoms include grey lesions outlined in black on the leaf blades. Severe infestations result in a "melting away" appearance, with the leaves collapsing, quickly decaying, exposing the soil underneath. Areas staying wet, in the shade, in low spots, frequently watered, infrequently mowed and recently fertilized are the most prone to grey leaf spot.

Centipede lawns fertilized earlier this year do not need to be fertilized at this time. Wait until fall for the next application.

As spring rains slack off and give way to drier days, apply supplemental water as needed. The rule of thumb is to water enough to wet the soil 5 to 6 inches deep. Do not water too frequently. Shallow, frequent watering promotes a shallow root system that is more susceptible to the stress of summer heat and winter cold.

LANDSCAPEPLANTS

The best way to conserve moisture in the landscape is by mulching. Pine bark, pine needles, cypress bark, composted grass clippings and shredded leaves are among the materials suitable for a mulch. A three to four inch layer over the root zone retains moisture, keeps the soil cooler and helps prevent weed seeds from germinating under your shrubs, trees and flowers.

As you check your shrubs, ground covers and flower beds, watch for seedling trees, such as oak, hickory and pecan. They are more easily pulled when young, and an old pair of pliers will help you get the grip needed close to the ground to pull up root and all. They are also more easily extracted when the soil is moist.

SUMMER COLOR

June is a great month for setting out colorful summer annuals. For large areas, try directly seeding zinnias, cosmos, gomphrena or portulaca. There are several others you can set out now as transplants including marigold, salvia, gaillardia, petunias, purslane, verbena, dusty miller, lantana, ageratum, amaranthus, gomphrena (globe amaranth or batchlor's buttons), celosia, Texas bluebells (or lisianthus), cockscomb, and firebush. Plant copper plants now in a sunny spot for a beautiful display this fall.

Color for shady areas include caladiums, coleus, impatiens and bedding begonias. Try nicotiana and coleus in partial shade, or for full sun the two Texas SuperStars (TM) SunColeus varieties 'Burgundy Sun' and 'Plum Parfait'.

Many nurseries now have a great supply of perennials to brighten the summer garden. Look for perennial hibiscus, canna, daylilies (select soon for the color you want), yarrow, summer phlox, salvia, perennial lantana, montbretia, Rudbeckia 'Goldstrum' and purple coneflower.

Plant mums now for fall bloom. Pinch back established mums, along with other fall bloomers like Mexican mint marigold, Mexican bush sage (Salvia leucantha) and autumn asters to encourage compactness and more flowers.

Water transplants before you plant and then again afterwards. The soil should be well- prepared with additions of organic matter, and well-drained. Apply a diluted solution of water-soluble fertilizer at planting and then regularly once plants begin to put on new growth. Remove faded blooms to encourage new growth and repeat bloom. A layer of mulch will conserve water and prevent weeds.

Summer tropical plants, though they are not freeze hardy, are perfectly at home in our East Texas heat and humidity. Plant them in the ground for quick growth or plant in pots or tubs so you can overwinter them indoors. Some of the best include tropical hibiscus, penta, oleander (semi-hardy), bougainvillea, mandevilla vine (spectacular!), agapanthus, trailing lantanas, allamanda vine and plumbago. These sun and heat lovers will quickly brighten up your yard and give a great display all summer and fall.

ROSES

Be sure to mulch your roses to conserve moisture and keep down summer weeds. Continue a routine spray program to control blackspot, and watch for insects and mites. Remove flowers as they fade and feed regularly to encourage new blooms.

AZALEAS

Apply a four to six inch layer of pine needles or other mulch to conserve water around these shallow-rooted shrubs. Feed them very lightly with a complete fertilizer to encourage production of new growth. Watch out for spider mites and lace bugs which feed on the underside of leaves. Their piercing and sucking causes the leaves to look stippled and bleached or bronzed.

PESTS AND PROBLEMS

One of the most common tomato disorders is blossom end rot. This is not a disease but a physiological problem caused by a lack of calcium and fluctuating soil moisture. Keep the soil evenly moist, mulch to conserve moisture and lime the soil before planting the next crop to provide calcium. Blossom end rot usually only affects the first tomatoes to ripen.

Spider mites can occur on tomatoes, roses, junipers, marigolds and other ornamentals now that the weather is hot and dry. Look for stippled leaves, and under severe infestations, fine webbing. Spider mites can be detected by taking suspicious leaves and rapping them over a white sheet of paper. Any dots which move are probably mites. Light infestations can be reduced by frequently syringing leaves with a sharp stream of water or using insecticidal soap. For more severe problems, use an approved miticide.


July -

plant (sun)
lantana, pentas, blue daze, dusty miller, purslane, periwinkle, torenia, salvia

shade: coleus, wax leaf begonias

fertilize acid plants with chelated iron: azaleas, gardenias, blueberries, camelias
iron deficiency: young leaves are yellow green with dark green veins

do not prune camelias

plant annuals: bluebells, moss rose, periwinkles, sun coleus, zinnias
Perennials: hostas, hibiscus, daylilies, salvias, purple cone flowers

water early and deep

mulch 3-4"

feed trees and shrubs

Plant Egg plant, pepper, tomato for fall garden

plant transplants for fall garden: tomato, eggplant, peppers --- best time is July 25th


August - keep beds mulched 3-4 inches for drought

plant annuals : marigolds, mexican heather, petunias
perennials: ornamental grasses, mexican butterfly bush, groundcovers

plant shasta daisies transplants

water early and deep

mulch, mulch, mulch!

treat for fire ants

Fall Garden:
aug. 1 - southern peas, pumpkins
august 10- winter squash
aug. 20th - plant lima bean bush, sweet corn,


September:

Plant annuals: petunias, dianthus, ornamental peppers, snapdragons
perennials: Mums, asters

prune roses

feed lawn

apply preemergent weed preventers

Fall garden:
sept. 1- plant snap bean bush, broccoli, brussel sprouts, cabbage, cauliflower, cucumber, potatoes
sept. 10 - kohlrabi, summer squash
sept. 20 - plant transplants - broccoli, cauliflower, brussel sprouts, cabbage

annual transplants: allysum, aster, calendula, dianthus pinks, petunias, phlox, snap dragons, stock,

October:
buy spring bulbs (to plant in december)

plant trees and shrubs
plant fall annuals: pansies, cyclamen
perennials: Mums

winterize lawn

reposition/thin out perennials if needed

fall garden:
garlic cloves
oct. 1 - swiss chard
oct. 10 - collards, leaf lettuce, parsley
oct. 15 - beets

annual transplants: alllysum, asters, calendula, dianthus pinks, flowering cabbage and kale, pansies, petunias, phlox, shasta daisies, snap dragons, stock, violas

November:
Buy spring bulbs (to plant in december)
plant wildflower seeds
plant trees and shrubs
plant fall annuals and perennials
overseed lawn with perennial rye grass
prune trees

Fall Garden:
nov. 1 - mustard, onion seed, turnip
Nov. 10 - carrots
nov. 15-spinach
nov. 25 - radish

transplants: allysum, asters, calendula, dianthus pinks, flowering cabbage and kale, pansies
petunias, phlox, shasta daisies, snap dragons, stock, viola

December:
plant spring bulbs with bone meal

plant fall annuals, perennials

transplants: allysum, asters, calendula, dianthus pinks, flowering cabbage and kale, pansies, phlox, stock, viola

plant or transplant trees and shrubs
prune trees
create container gardens to bring fresh color onto patio and into home

water late in day and in advance of freezes

TEXAS VARIETIES TO PLANT
(PER A&M)
Search for These Texas Varieties

Why is selecting the proper vegetable varieties so important? If you've been gardening for any length of time, you are well aware that there are many, many different varieties of garden vegetables. However, only three or four varieties of any one vegetable are well suited or adapted to your particular area of Texas.

Get the varieties that do well in your area of the state. Planting proven varieties is much better than picking varieties because of catchy names or availability. Listed below are the vegetable varieties recommended for use in Texas gardens. Your local county Extension agent may also have a listing of additional varieties worthy of use in your area.

Asparagus 

UC 157, Jersey Giant, Jersey Gem


Beans

Snap - Topcrop, Tendercrop, Tendergreen, Kentucky Wonder, Greencrop
Pinto - UI-114, Dwarf Horticultural, Luna
Lima - Jackson Wonder, Florida Butter, Henderson Bush


Beets 

Pacemaker, Detroit Dark Red


Broccoli

Packman, Baccus, Green Comet


Cabbage

Bravo, Rio Verde, Red Rookie


Carrots 

Texas Gold Spike, Orlando Gold


Cauliflower

Snow Crown


Chinese Cabbage

Jade Pagoda, Monument, Napa, China Pride


Cucumbers

Slicers - Poinsett 76, Sweet Success, Dasher II, Sweet Slice
Pickling - Calypso, Carolina


Eggplant 

Florida Market, Florida High Bush


Oriental Eggplant

Tycoon


Garlic 

Texas White


Greens

Collards - Blue Max, Georgia Southern

Chard - Lucullus, Ruby


Kale 

Vates, Blue Knight


Lettuce

Crisp Head - Mission

Loose Leaf - Prizehead, Red Sails, Black-Seeded Simpson

Butter Head - Buttercrunch


Melons

Cantaloupe - Mission, Primo, Caravelle

Honey Dew - TAM Dew, Honey Star


Mustard

Green Wave, Tendergreen, Southern Giant Curl


Okra

Clemson Spineless, Lee, Emerald


Onions

Bulb - Texas 1015 Y, Early Grano 502, Granex 33

Green - Evergreen Bunching, Crystal Wax


Pepper

Bell - Supersweet 860, Capistrano

Hot - TAM Mild Jalepeño, TAM Hidalgo Serrano

Sweet Jalepeño-shaped - Rio Grande Gold


Potatoes

Irish - Red: Red LaSoda, Norland;

White: Kennebec

Sweet - Beauregard, TAMU Corder, Centennial, Jewel


Pumpkin

Large - Connecticut Field, Big Max

Medium - Jack O'Lantern, Funny Face

Small - Jack-Be-Little


Radish

Cherry Belle, Sparkler, White Icicle


Southern Peas

Purple Hulls - TX Pink Eye

Cream - Cream 40, Champion

Black Eye - California #5

Crowder - Mississippi Silver, Zipper


Spinach

Savoy - Green Valley II, Ozarka II, Fall Green, Coho (semi-savoy)


Squash

Summer - Goldie, Gold Bar, Multipik
Zucchini - President, Senator

Butternut - Waltham, Early Butternut


Sweet Corn

Summer Sweet 7800, Sweet G-90, Kandy Korn, Silver Queen, Guadalupe Gold


Tomatoes

Bingo VF, Carnival VF, Heatwave VF, Celebrity VFNT, Merced VF, Surefire VF, SunMaster VF


Cherry Tomato

Small Fry, Cherry Grande


Turnips

White Lady, Royal Globe II


Watermelon

Standard - Jubilee, Royal Charleston, Royal Jubilee, Royal Sweet, Sangria, All Sweet

Seedless - Tri X-133, King of Hearts

Composting

Things to "give back" to the earth to work into your soil:

wet shredded paper
wet shredded boxes
shredded tires
leftover veggies
ashes from wood burn pile
grass clippings

Propagation of Azaleas

AZALEA PROPAGATION


Plant propagation is somewhat more difficult than planting a container-grown azalea. We have included a list of resource material at the end of this section that includes the sources of the information printed here.

You may root cuttings and grow plants many ways. Whatever method of propagation is used, sanitation and cleanliness is very important for success. The stock plants should be healthy, and the equipment used, the propagation preparation area, and the propagation area, greenhouse, or cold frame should be disinfected. Generally, most evergreen azaleas are easy to propagate. The problem is that not all species can be propagated using the same method. Each of the several methods of propagation have advantages and disadvantages. Azaleas are propagated from seeds, stem cuttings, root cuttings, layers, and grafting. Stem cuttings are the most popular method.

Seed Propagation

Propagation by seed is a good method for many deciduous azaleas and other cultivars that are difficult to propagate by cuttings or other methods. Seed capsules are green and turn yellow to brown when mature. Capsules should be collected when they begin to turn brown, mid- to late autumn. If the capsule has split open, seeds will readily drop out. Store the seed capsules at room temperature in paper envelopes or open-top containers. Each capsule contains 100 to 500 seeds. The seeds can immediately be germinated or stored at 20°F in an air-tight container for later use.

The sphagnum moss method is generally used for germination. Sphagnum should be shredded or milled, saturated with water, squeezed dry, and fluffed. The ideal container for germination would be a 3-inch deep, plastic container with a clear lid. Punch small drainage holes in the bottom. Rinse the container with a 10-percent chlorine bleach solution (1 cup bleach to 9 cups water) to sterilize the container. Fill the container to within 1 inch of the top with sphagnum. Scatter seeds over the moss and mist them lightly with water. Covering the seeds is not necessary. Close the containers and place them in indirect or fluorescent light. Keep the temperature between 60° and 75°F. Germination should begin within 2 to 4 weeks. Seedlings can be transplanted into individual containers or flats within 8 to 10 weeks.

Propagation By Stem Cuttings

Propagation by cutting is used most frequently for evergreen azaleas. Cuttings should be made from new wood (June and July) of healthy, mature plants. Suitable new wood should snap when broken. Cuttings should be 3 to 6 inches long with the leaves removed from the lower one-third to one-half of the cutting. Insert the cuttings 1 to 112 inches deep in the rooting medium. Rooting medium varies from (a) equal parts of perlite and peat; (b) 1 part peat and 2 parts perlite; to (c) bark, peat, and perlite. Before sticking the cuttings, the rooting medium should be thoroughly moist (not wet) and firm.

Flats or individual pots may be used, depending on preference or the quantity of cuttings. Azalea cuttings can be rooted outside in a shady area if humidity is high, in a greenhouse under a mist system, or under enclosed plastic structures in shady areas. Rooting will normally occur in 4 to 6 weeks. The problem in rooting all cuttings is trying to get roots initiated before the cuttings dry out. You prevent drying by increasing humidity, increasing shade, reducing air movement, and maintaining 100 percent humidity. Rooting hormones such as Hormex, Hormodim, Dip & Grow, and others also help in increasing the number of roots on the cutting.

Propagation By Layers

Layering is a modification of propagation by stem cuttings. It is a slow process, but it can be useful if the number of plants to be propagated is small. Branch layering is the easiest method of layering. A low, sweeping branch is selected and bent to the ground. A wound is made on the stem by making an upward cut 1 to 12 inches in length along the underside of the branch. The branch is buried 3 to 4 inches deep at the cut. The top of the branch is bent upward. The buried part of the branch should be pegged down with wire or a rock and covered with mulch. It frequently takes more than a year before the new plant can survive on its own roots. However, for the home gardener, this is often the easiest method to get a few extra plants.

Propagation By Grafting

Propagation by grafting is used in Europe, but it is not commonly practiced in the United States. It is frequently used to produce unusual plants, such as tree azaleas. Grafting is a means of propagation where a desirable bud or cutting (scion) of an azalea or other plant is attached to the roots or understock of a plant of a similar kind. The two parts join together and grow as one. The understock should be actively growing, but the scion should be dormant. A side graft is recommended, with the cambium layers of the understock (the light green tissue immediately under the bark) and scion matching before securing. Wrap the graft union with damp sphagnum. Cover the entire graft with a plastic bag. Once the scion begins to grow, gradually increase the volume of air by punching holes in the plastic bag. When the scion has hardened off, the top of the understock should be removed above the graft union.

To be successful, sanitation and cleanliness must be observed no matter which method of propagation is used. Remember, the stock plants should be healthy, and the equipment used, the area processed, and the greenhouse should be disinfected.


Source: http://www.aces.edu/pubs/docs/A/ANR-0200/prop.html

Propagation of Clematis

CUTTINGS

Cuttings should be taken in June from stems grown that year (not woody stems grown the previous season), but avoid the very soft part of the stem at the top end. The cuttings described below are often referred to as 'internodal' cuttings (taken between two leaf joints).

STEP 1
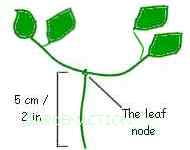
Cut the main stem about 5cm (2in) below a leaf joint - use a clean, sharp knife to avoid crushing the stem when cutting.

STEP 2
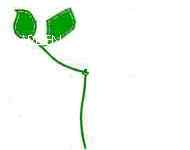
Cut the main stem as near as possible just above the leaf joint. See diagram to the left to illustrate the cutting.

STEP 3
Cut away the leaves and stalk from one side of the stem and trim off any excess leaves from the other side so that only two leaves remain.

This trimming process will reduce loss of water through the leaves of the cutting.

Having created the clematis cutting, dip the base of the cutting into hormone rooting powder (to help the cutting produce roots), and insert it into a small pot filled with potting compost. Don't force the cutting into the compost - make a small hole first, place the cutting in the hole and gently firm the compost round the stem.

The cutting should be placed in the compost so that all of the main stem is covered. Only the very top of the stem and the leaf and stalk should be above the compost. Water well (preferably from the base) then label and date the cutting.

To avoid the cutting loosing too much water place it in a covered propagator, or cover the pot with a plastic bag. Place the covered cutting in a light protected place but not one exposed to direct sunlight.

Plants grown this way will be ready for planting out after a year (re-pot into larger pots as the roots fill the pot) and will flower after another year.


LAYERING

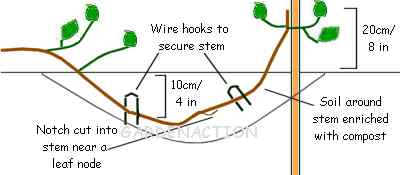
Layering is one of the easiest methods of growing more of your clematis plants. First prepare the area where the stem will be in the ground by digging in as much well-rotted organic matter as possible (spent potting compost will be fine). A good time for layering is early autumn.

Then, make a small notch in the stem (near a leaf node) which will be under the soil (see diagram below). This will greatly help the stem grow roots from that point.

Dig out an area about 20cm (8in) deep by 60cm (2ft) and fill half of it with a mixture of the original soil and well-rotted organic matter. Gently bend the stem down into the soil and pin it down with two wire hooks to keep it in place. Cover the stem with with more mixed soil and compost.

Normally the layered stem will have produced a good root system by the next season's autumn. It then will be ready to be severed from the parent plant, dug up and placed in it's new position.

source: Gardenaction.com

Herbs


Stevia (Stevia rebaudiana) has received a lot of press lately as a sugar substitute. It is 30 times sweeter than sugar, but has no calories and does not adversely affect blood glucose levels so may be used freely by diabetics. Stevia plants are easy to grow in pots or in the garden. Plants reach 15 inches in height with small round, light green leaves. Clusters of small white flowers appear on tops of slender stems in summer. For best taste, harvest Stevia leaves before the plants flower. Leaves can be used fresh in tea, or dried and ground into powder for future use.

Stevia is a short lived, tender perennial best grown as an annual in our area. Provide morning sun and afternoon shade and regular water.

Source: Blue Moon Gardens

Stevia is also known for its use as a natural antiviral, antibiotic, and antifungal. Tastes great in coffee :)

Rain Water Harvesting

Rain chain with rain barrel:

In many Texas communities between 30% and 50% of the total water supply is used for landscape irrigation. You can save money and this precious resource by collecting and storing rainwater and using it to irrigate trees, shrubs, lawns and gardens.

A very simple but effective system uses a rain chain attached to your existing downspout which channels water into a rain barrel. This specialized barrel has a filter on top to keep out debris, an overflow tube and a short garden hose with a shut off for quick filling of watering cans or to attach a longer hose.


source: Blue Moon Gardens, Chandler, Texas


did you know that one inch of rain on 1,000 square feet of roof can produce 6,000 gallons of rainwater?


hand painted rain barrel

Propagation of Roses

Grandma's Mason Jar
Propagating Roses by Rooted Cuttings

Master Consulting Rosarian

Everybody has a story to tell of how their grandma would stick a piece of rose stem into the ground and then place a Mason Jar over the stem to make it grow. There are tales of how the early American settlers of the 1800's traveled to the far reaches of the wild west in covered wagons, with grandma bringing along "starts" of her favorite roses from back home. Perhaps the treasures of these "monsters on wooden wheels" were raided, and they discovered the Yellow Rose of Texas hiding under the bonnets of the women. Or maybe the settlers used their precious "starts" to barter for provisions along the endless dusty trails.

Rose propagating methods have changed over the years, from the simple own-root varieties of the Victorian era, and progressing to the budded hybrids of the 20th century with its many options of exotic understock such as Rosa multiflora, Dr. Huey, Manettii, and Fortuniana. Now, rumor has it that many of the modern hybridizers and commercial growers are interested in returning to the simplicity of yore. Today's commercial rose growers are finding that budded roses are just too labor-intensive and expensive to produce. Because of this, it appears that we can look forward to more own-root roses being introduced and sold at our local nurseries in the future. Own-root roses will eliminate suckering and hopefully will eventually help to eradicate mosaic virus.

Although miniature roses have always been grown on their own roots since the 1950's when they were first introduced, Ralph Moore of Sequoia Nursery in Visalia, CA, near Fresno, has also offered many of the larger roses on own-root along with his vast selection of minis. His Playgirl floribunda has always been sold by Ralph as own-root cuttings in 4-inch pots, as well as a good assortment of other own-root floribundas and old garden roses.

Heirloom Roses of Oregon, offers a huge catalog of old garden roses and shrubs that are mostly grown on their own roots. The plants may look puny when you first receive them, but it doesn't take long before they are up and running as fast as their budded counterparts in the garden. Visit their web site at www/heirloomroses.com.

So grandma had the right idea in the first place, and she really did know what she was doing. It has always been fun to start roses from cuttings. Some people get their kicks by going "rose rustling" in the deserted cemeteries of old and forgotten mining towns. Others just take a twig from their favorite rose and stick it into the ground in their backyard. There is nothing complicated nor scientific about taking cuttings of roses and rooting them to "start" a new plant. There are various ways of taking rose cuttings, so let's tell you how.

Stick in the Mud Method: I know of some people who have simply stuck the cuttings in the ground without covering it with a jar, and they have had some success. This method works best in mild climates with good soil.


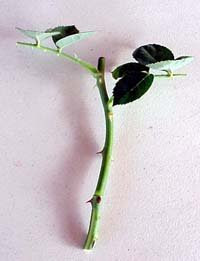
Grandma's Mason Jar: For the beginner this is probably the easiest way to take cuttings. Not much equipment is needed, just a clear quart-size glass jar and some cuttings from your favorite rose. For you modern sodapop lovers, a 2-liter plastic bottle with the bottom cut off will work just as well. Cut a piece of rose stem about 6 inches long, remove the bottom set of leaves, and just stick the stem into the ground (or into a pot) a couple inches deep, and cover with a jar or bottle.


You will need to periodically water the soil around the jar, otherwise the rose stem will dry out. It will take a couple of months for the rose stem to take root and begin leafing out with its new growth. The best time of year is spring or early fall. If you live in a mild climate, then winter and summer can also be successful for rooting roses. Intense summer heat of 100 degrees is not conducive for taking cuttings, nor are 32 degree or below winters.

The Baggie Method: This was the first method I ever tried. Here you fill 2-inch plastic pots with potting soil, insert the rose stem halfway inside the pot, then put the pots into a one-gallon plastic zip-lock bag. You can get four 2-inch pots into each gallon bag. I didn't like this method because it caused many of the cuttings to rot since the bags tended to fold over and therefore prevented the air from circulating. The success rate of this method is not very good. It may be helpful to place a couple of small sticks inside the bag to help keep it upright and full of air.

The Misting Method: As you get more sophisticated in your rose propagating methods you may eventually want to set up a misting bench. It can be an open-air bench or one enclosed in a greenhouse, or even a small misting box, similar to the one my husband Bob built for me. (Refer to "How We Made Our Misting Box," from Rose Ecstasy, March 1999). You could choose to rig it up with a manual or an automatically-timed mister, whatever your time, money, or expertise will allow. I am fortunate to have a very handy guy for a husband, who is a good sport whenever I come up with these crazy project ideas.

When we first set up our mister, we installed two battery-powered timers, as each one only had four times per day that it could turn on. The first model we purchased could not handle our very high water pressure of 120 psi and kept exploding. Other models we tried were just not dependable in coming on every hour, and the batteries often failed.

Now we are trying the Mist-a-Matic system. We got ours as a hand-me-down from an elderly rosarian friend who retired to a nursing home. But, you can buy a new one from E.C. Geiger for about $350.00. Here's how the Mist-a-Matic works:

A special stainless steel screen on the handle of the unit raises up when it is dry. When this happens, it throws the mercury switch which opens the solenoid valve and starts the misting cycle. When this stainless steel screen accumulates enough mist, the weight of the water drops it down again, shutting off the mercury switch, closing the solenoid valve. It needs practically no care or maintenance and can be left on, unattended day and night. This control unit is a very practical instrument which will have a long lifetime of carefree maintenance. There are no clocks to adjust, and it is not affected by water conditions. It works simply on the weight of water. The major benefit of the Mist-a-Matic is to control the misting cycle according to weather conditions. Too much water promotes disease and wastes water. Too little water causes leaves to wilt and failure to root. The Mist-a-Matic distributes the correct amount of water. In hot weather, the unit will turn on more frequently as the water evaporates. In cooler weather, the unit turns on less frequently. For operation, you will need to plug the unit into an electrical outlet. You need to hook it up to a water source with misting nozzles.

Planting Mediums: The planting medium that I have found to be the most successful for rooting rose cuttings is a 50-50% blend of potting soil and perlite. This is a very light blend that encourages the roots to grow quickly. Others have used blends of sand or vermiculite with some success.

Other Tips for Rooting Cuttings:
o Use sharp cutters to prevent crushing the stem.
o Rooting hormone is optional; success rate is much better with it.

o Label your rose cuttings with their proper name.
o It takes 4 to 8 weeks for the cutting to root, depending on the weather and the rose variety.
o Keep the cuttings moist at all times, with good air circulation and sunlight.
o Make slits in the bottom inch of the stem to encourage more rooting. I scrape off some of the stem with a knife.

o Make sure the pots are very clean before using them, especially if you are reusing them. Wash them out with soap and hot water. An automatic dishwasher works well for cleaning small pots.

NEW OR OLD WOOD?
I have successfully taken cuttings with both new and old wood. It is important to let the new stems sufficiently mature. The new wood is usually mature enough after the stem has just finished blooming. If you don't let the stem mature enough, then it usually becomes limp and will die before you can get it to root. I take cuttings from new rose stems in the spring right after the first bloom cycle. Then in early to late fall (in Southern California) I prefer to use more mature or old wood. When using old wood in the fall, I will remove the cuttings from the Mason jar, baggie, or mister, after only several weeks since it is cool enough then for them to root on their own as long as I water them daily.

Reprinted from the September 2000 issue of Rose Ecstasy, bulletin of the Santa Clarita Valley Rose Society, Kitty Belendez Editor.

Growing Roses from Seeds: http://scvrs.homestead.com/HybridizeKB1.html

Gardens of Inspiration

Dallas Arboretum:


Various other gardens:


Butchart Garden, Vancouver

Creating our Garden of Eden


This picture of Ashley and Alexis shows the pond in the background. We plan to add fountains to this. This pond is on the right side of the property in front of the paint ball court and woods with the creek leading to the lake.


This photo shows the driveway in the front of the property. At the entrance, we plan to add waterfalls on both sides of the entrance. As you enter, a heart shaped marble and stone structure is in place which we plan to put a fountain in.


Right side of property....undeveloped. Dirt road currently leads to trails for four wheelers and the paint ball course. Behind the trees we plan to dredge all this and make this a water cove. It has a small creek that runs behind the trees leading to the lake. In this picture you see a flock of guineas that show up from time to time, I wanted to catch a photo of them :) This was taken around October. We also plan to cultivate this more and make it a shade planting area.


Back yard last year. Pool has negative edge appearing to fall into the lake. You can see the woods on the right side where we can dredge and bring the lake to two sides of the property.

In this photo you can also see the banana trees on the left and the palm trees down by the lake.