CUTTINGS
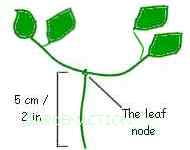
Cuttings should be taken in June from stems grown that year (not woody stems grown the previous season), but avoid the very soft part of the stem at the top end. The cuttings described below are often referred to as 'internodal' cuttings (taken between two leaf joints).
 | STEP 1 STEP 2 |
| STEP 3 Cut away the leaves and stalk from one side of the stem and trim off any excess leaves from the other side so that only two leaves remain. This trimming process will reduce loss of water through the leaves of the cutting. |
|
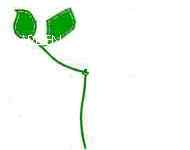
Having created the clematis cutting, dip the base of the cutting into hormone rooting powder (to help the cutting produce roots), and insert it into a small pot filled with potting compost. Don't force the cutting into the compost - make a small hole first, place the cutting in the hole and gently firm the compost round the stem.
The cutting should be placed in the compost so that all of the main stem is covered. Only the very top of the stem and the leaf and stalk should be above the compost. Water well (preferably from the base) then label and date the cutting.
To avoid the cutting loosing too much water place it in a covered propagator, or cover the pot with a plastic bag. Place the covered cutting in a light protected place but not one exposed to direct sunlight.
Plants grown this way will be ready for planting out after a year (re-pot into larger pots as the roots fill the pot) and will flower after another year.
LAYERING
Layering is one of the easiest methods of growing more of your clematis plants. First prepare the area where the stem will be in the ground by digging in as much well-rotted organic matter as possible (spent potting compost will be fine). A good time for layering is early autumn.
Then, make a small notch in the stem (near a leaf node) which will be under the soil (see diagram below). This will greatly help the stem grow roots from that point.
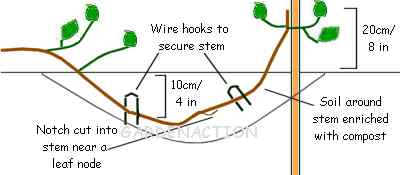
Dig out an area about 20cm (8in) deep by 60cm (2ft) and fill half of it with a mixture of the original soil and well-rotted organic matter. Gently bend the stem down into the soil and pin it down with two wire hooks to keep it in place. Cover the stem with with more mixed soil and compost.
Normally the layered stem will have produced a good root system by the next season's autumn. It then will be ready to be severed from the parent plant, dug up and placed in it's new position.
source: Gardenaction.com


No comments:
Post a Comment